The secrets of configuring WCCP

Back in the old days, everybody was running a proxy server. Not just because of slow WAN speed, but for the usual things: monitoring, virus filtering and controlling. Today, slow WAN is not really a valid reason anymore, but everything else still is. Network admins with a linux environment were in a comfortable position: install squid, set it up on the client and off you go. If there were many clients to support, then came iptables to the rescue. A little PREROUTING, DNAT tweaking and all traffic destined to port 80 suddenly ended up at the proxy, which was set to transparent mode. Job done. Those less fortunate and without a linux skill, or a linux gateway had more problems achieving the above. WCCP to the rescue! Let's dig deep, as we normally do.
WCCP stands for Web Cache Control Protocol and is so much more powerful than having a linux iptables! Here are the key points. With iptables, you don't really have a way to monitor if your proxy server is still working. If it's unreachable or down, you're blackholing traffic. Which also means, your proxy just became your single point of failure (SPoF). Having one is not acceptable in an enterprise network, let's be honest. So you need to have multiple proxies, if not because of the load you're facing, or the high number of clients, but to have a resilient design. But because iptables can only redirect traffic to a single IP address at any given time, you need some tweaking. How do you make this resilient? One option is to make the proxy servers resilient. Have an IP address roam between the proxy servers. You can script this, so servers would take ownership when the active one dies. Drawbacks: 1) only one proxy can be active at a time (not too efficient), 2) you need a robust algorithm to share the single IP address, 3) failing over can take a minute or two, depending your script. Another option is to have several iptables rules redirecting traffic to different proxy servers based on source address. For example, you could cut a /24 network in half, lower /25 uses proxy A, upper /25 uses proxy B. Drawbacks: 1) still there is a single point of failure (the proxy), it's just that now it affects half the people, 2) load is distributed unevenly. Not an ideal solution either. Yet another solution could be to script the iptables entry that does the DNAT for http traffic and redirect clients to a second proxy should the first one fail. Again, drawbacks: 1) failover can take time, 2) you are limited to one active proxy at a time, even if you have more.
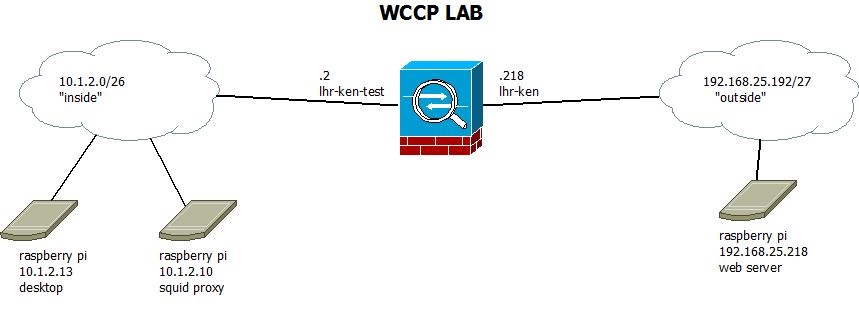
All of the problems above are eliminated when you use WCCP. WCCP can handle several proxies, can distribute load based on a hash algorithm, can detect failing servers almost immediately, and can let clients bypass proxies, if there is not a single working one left in the network, so end users won't be seeing any downtime at all. In this post, I'll show how to configure a WCCP environment with a linux based squid proxy using a cisco ASA 5505. How is this different from all the documents you have seen previously? This one helps you troubleshoot and also is complete. While I was configing WCCP at home, I had a major problem which was extremely hard to find a solution to. No documents mentioned this as a potential problem, so I'll make sure to highlight it here. Let's examine the topology below.

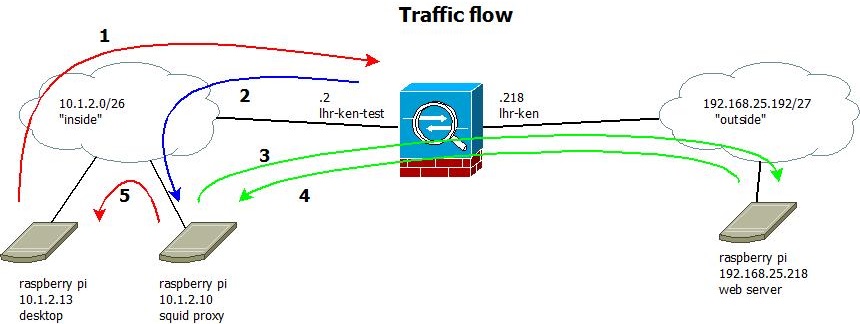
This is the lab network I've created for the purpose of having WCCP. Please do remember, that you need to have your linux based proxy server on the same interface as your clients. This is a limitation of the ASA, you'll see why. In case of the 5505, I have a base licence, so I'm limited to two and a half interfaces anyways (as the third interface can only talk to one, but not both). So in the diagram you can see my 'outside' network is 192.168.25.192/27 and the interface on the ASA is called lhr-ken. The 'public' IP address here is 192.168.25.218. The 'inside' network is 10.1.2.0/26, the inside interface address of the ASA is 10.1.2.2 and the inside interface is called lhr-ken-test. As I'm a big fan of the raspberry pi, I'm using three in this diagram. One for acting as a web server on the outside, and two on the inside: one acting as proxy and one acting as client. The client also has a gui and is actually a pi 2, but this is irrelevant from a network point of view. Let's look at the same diagram again, but this time please observer the traffic path.

Now we can start the actual implementation. I'll assume you have your network set up, pings are working, so is HTTP access through the ASA without a proxy, you have squid installed. Please take a look at the file wccp_squid.conf.txt attached to this post which is a full working (but also: minimal) config file for a working transparent squid proxy. Please note you'll have to change IP addresses and paths to suit your needs. This config file is from a default squid install from a raspbian distribution. The key config settings are:
wccp2_router 10.1.2.2
wccp_version 4
wccp2_forwarding_method gre
wccp2_return_method gre
wccp2_service standard 0
Make sure you set your ASA's 'inside' IP address as wccp2_router address and note that this configuration does not use any password to encrypt traffic. Having a password is optional but useful. I'm bypassing having one so troubleshooting and capturing network traffic will be easier. Once you have your setup ready to go, do add one. After starting up squid (make sure it starts with no errors) it's time to configure the ASA. Apply the following configuration to the ASA's existing config:
access-list wccp_servers extended permit ip host 10.1.2.10 any

access-list wccp_access extended deny ip host 10.1.2.10 any
access-list wccp_access extended permit tcp 10.1.2.0 255.255.255.192 any eq www
The first ACL defines the WCCP server. The second ACL is actually a traffic selector, it tells the ASA what traffic to redirect to the proxy. Please note that you do _not_ have to have your exempt your proxy with a deny statement, the ASA takes care of this automatically. I included it there because it is already configured implicitly by the ASA so it would be invisible, but it's logical to have it there. But as you can see from the traffic counters, the hitcount is actually zero:
asa5505# sh access-list wccp_access
access-list wccp_access; 2 elements
access-list wccp_access line 1 extended deny ip host 10.1.2.10 any (hitcnt=0) 0x205edf58
access-list wccp_access line 2 extended permit tcp 10.1.2.0 255.255.255.192 any eq www (hitcnt=9439) 0xc8cba0c8
asa5505#
The next step is to issue the two commands to actually enable WCCP on the ASA. For this, use:
wccp web-cache redirect-list wccp_access group-list wccp_servers
wccp interface lhr-ken-test web-cache redirect in
The first command identifies the service to be redirected, the second is defining on which interface the redirection should happen. Do remember, that WCCP is only supported inbound. Now, let's move on to the linux side of the configuration. Two things need to be configured: the squid proxy (settings above, full configuration attached to this article) and the operating system. Things that need to be taken care of: iptables DNAT, the GRE tunnel and all associated minor settings (forwarding, rp_filter). GRE stands for General Routing Encapsulation and can be seen as a packet in a packet, literally. It is nothing more, than a full grown IP packet with all the layers inside it encapsulated in another. This is how redirected traffic is sent from the ASA to the proxy and this is a crucial element. Let's start with the configuration on the linux side.
iptables -t nat -F PREROUTING
iptables -t nat -A PREROUTING -i wccp0 -p tcp -m tcp --dport 80 -j DNAT --to-destination 10.1.2.10:3129
Creating the iptables DNAT is the same as it was before in the old days, no magic here. The first rule flushes the PREROUTING chain in the NAT table, this is just to start with a clean state. Do excercise caution, you may have other rules here, that will be removed by this, but in my case, this was only a lab environment, nothing in production. The second command creates a rule in the PREROUTING chain that rewrites layer 3 and 4 packet headers. Please note that the inbound interface wccp0 hasn't been created at this stage, and do check that the destination of the DNAT is the squid proxy's IP address on the inside. Also, the port number (here: 3129) needs to match the port number in the squid config. I chose 3129 deliberately over 3128. Next up is creating the GRE tunnel. This is where the secret lies.
ip tunnel add wccp0 mode gre remote 192.168.25.218 local 10.1.2.10 dev eth0
ip addr add 10.1.2.10/32 dev wccp0
ip link set wccp0 up
Several things to note here! This step is a tricky one and most posts never mention this. Pay attention to the following output, observer from the Cisco ASA 5505:
asa5505# sh wccp

Global WCCP information:
    Router information:
        Router Identifier:                   192.168.25.218
        Protocol Version:                    2.0
The most important thing in this output is the Router Identifier. This is the _highest numbered_ IP address the box has. This is chosen automatically and can not be altered. As in my case, the internal ip address is 10.1.2.2, 192 is a higher number than 10, so the outside IP address is chosen by the ASA. Why is this important? This is important, because this IP address will be the source IP address of the GRE tunnel. If you scroll up now a bit and take a look at the wccp0 GRE tunnel configuration, on the linux, you can see that the remote IP address is the outside IP address of the ASA. This does not make sense. Logic would tell you to use the inside interface address, as that's the closes to the proxy, in my case 10.1.2.2. This will not work. Regardless of inside or outside, the ASA sources the GRE tunnel packets with the Router Identifier as an IP address. Note that the above GRE configuration is _not_ a real tunnel, it's just the encapsulation configured, so the linux can get the real packets embedded in the tunnel and can start processing it. As I've been using my ASA's internal address, I've spent a day figuring out why the tunnel is not working. Don't make the same mistake. And while at it, do not forget to enable routing and disable some checks:
echo 1 > /proc/sys/net/ipv4/ip_forward
echo 0 > /proc/sys/net/ipv4/conf/default/rp_filter
echo 0 > /proc/sys/net/ipv4/conf/all/rp_filter
echo 0 > /proc/sys/net/ipv4/conf/wccp0/rp_filter
The first line enables IP forwarding in general. Without this, your squid box will not forward / DNAT packets and they will never make it to the proxy. The following three lines are a bit redundant to be honest and you may not need all. These three lines disable reverse path filtering which is a security measure. When a box receives a packet, if rp_filter is set, linux will check whether or not the source ip address of that packet is reachable through the interface the packet just came in. It's a simple check to prevent spoofed addresses from being routed. In this particular case, the squid proxy has a sinlge physical interface only, but there is a logical tunnel interface. And the default route is still pointing to eth0, not wccp0. So the reverse path check would fail if it remained in force, so this is why you need to turn it off.
Once you have this all set up, you're ready to rock. Do some final checks and enjoy having WCCP running. To test, please see the example below, this is what a successful request should look like.
pi@raspberrypi wccpclient:~$ wget -O /dev/null http://bix.hu
--2015-04-02 12:58:43--  http://bix.hu/
Resolving bix.hu (bix.hu)... 193.239.149.1
Connecting to bix.hu (bix.hu)|193.239.149.1|:80... connected.
HTTP request sent, awaiting response... 200 OK
Length: 6497 (6.3K) [text/html]
Saving to: `/dev/null'

100%[================================================================================>] 6,497       --.-K/s   in 0.05s

2015-04-02 12:58:43 (129 KB/s) - `/dev/null' saved [6497/6497]

pi@raspberrypi wccpclient:~$
If the output is nothing like this, it's time to start troubleshooting:
raspberrypi:~ wccpserver # iptables -t nat -L PREROUTING -v -n
Chain PREROUTING (policy ACCEPT 3 packets, 172 bytes)
 pkts bytes target     prot opt in     out     source               destination
   42  2520 DNAT       tcp  --  wccp0  *       0.0.0.0/0            0.0.0.0/0            tcp dpt:80 to:10.1.2.10:3129
raspberrypi:~ wccpserver #
raspberrypi:~ wccpserver # tcpdump -i wccp0 -vvv -n
tcpdump: listening on wccp0, link-type LINUX_SLL (Linux cooked), capture size 65535 bytes
12:59:33.609247 IP (tos 0x0, ttl 64, id 60585, offset 0, flags [DF], proto TCP (6), length 60)
    10.1.2.13.41899 > 193.239.149.1.80: Flags [S], cksum 0xc064 (correct), seq 519146786, win 29200, options [mss 1460,sackOK,TS val 15884683 ecr 0,nop,wscale 7], length 0
raspberrypi:~ wccpserver # tcpdump -i eth0 -vvv -n proto gre
tcpdump: listening on eth0, link-type EN10MB (Ethernet), capture size 65535 bytes
13:02:12.362574 IP (tos 0x0, ttl 255, id 8062, offset 0, flags [none], proto GRE (47), length 88)
    192.168.25.218 > 10.1.2.10: GREv0, Flags [none], length 68
        gre-proto-0x883e
raspberrypi:~ wccpserver # tcpdump -i eth0 -vvv -n udp and port 2048
tcpdump: listening on eth0, link-type EN10MB (Ethernet), capture size 65535 bytes
13:03:53.957433 IP (tos 0x0, ttl 64, id 46089, offset 0, flags [none], proto UDP (17), length 172)
    10.1.2.10.2048 > 10.1.2.2.2048: [bad udp cksum 0x18b7 -> 0x8876!] UDP, length 144
13:03:53.958161 IP (tos 0x0, ttl 255, id 11446, offset 0, flags [none], proto UDP (17), length 168)
    10.1.2.2.2048 > 10.1.2.10.2048: [udp sum ok] UDP, length 140
asa5505# debu wccp packets
asa5505# term mon
asa5505#
WCCP-PKT:S00: Received valid Here_I_Am packet from 10.1.2.10 w/rcv_id 00003D7B
WCCP-PKT:S00: Sending I_See_You packet to 10.1.2.10 w/ rcv_id 00003D7C
asa5505# un all
asa5505#
asa5505# sho wccp

Global WCCP information:
    Router information:
        Router Identifier:                   192.168.25.218
        Protocol Version:                    2.0

    Service Identifier: web-cache
        Number of Cache Engines:             1
        Number of routers:                   1
        Total Packets Redirected:            8072
        Redirect access-list:                wccp_access
        Total Connections Denied Redirect:   0
        Total Packets Unassigned:            1
        Group access-list:                   wccp_servers
        Total Messages Denied to Group:      0
        Total Authentication failures:       0
        Total Bypassed Packets Received:     0
asa5505#
asa5505# sh wccp web-cache view

    WCCP Routers Informed of:
        192.168.25.218

    WCCP Cache Engines Visible:
        10.1.2.10

    WCCP Cache Engines NOT Visible:
        -none-
asa5505#
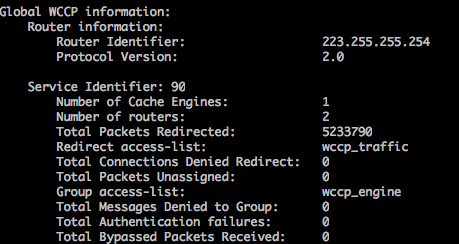
This was originally the end of the article. However, after several months I posted this, I got an email from a reader thanking for this post, and asking for advice. His WAN IP address happened to be higher than the RFC1918 IP and was a dynamic IP. He was wondering how to keep the GRE tunnel static, as the endpoint IP address was always changing. So I suggested that he should have a dummy interface with the highest possible IP address, and let that be the GRE endpoint address - which it automatically will be. He tested it and found it working, so please thank him the image below, showing a working setup for this scenario.
