Taking you one step ahead
Introduction to Load Balancing

As you are well aware, there are two main categories in this blog. Contents are divided for home / small business users, and enterprise users. This is for a perfectly good reason. Having worked in both environments, I'm confident that people belonging to each group face quite different challenges. They have different problems and different approach to solving them. Usually the 'good' stuff is in the enterprise section - this is where the seirous things happen. Sorry, SOHO folks. For this very reason, when it comes to introducing a new technology to the SOHO readers, I'm super excited. This is like sending a bottle of champagne from business to economy. And it so happens that while writing this, I'm mid-air to Madrid, flying business class, so instead of sending a bottle to whoever is interested in Economy, why don't I send back something useful - an introduction to load balancing, and a guide on how to set up your own.
Welcome to the wonderful world of resiliency and high availability. Wonderful indeed, as this is how things should always be done. Engineers hate to be woken up in the middle of the night, furthermore, they hate being rushed. If money wasn't a restriction, they'd build a network so resilient, it can never stop functioning. Dozens of routers doing the same thing parallel - so they can go and enjoy a nice vacation. Unfortunately money is always a concern, so here we are, balancing between the CFO and the CTO as it also happens that both want the best - from their point of view.
Load balancing is a technique where incoming requests are served by not one dedicated box, but multiple boxes. Imagine not one but two or more identical web servers (apache or whatever you'd like) with the exact same content. Static webpages can be the simplest example, but since most dynamic pages are built on data from backend SQL servers, as long as the program is identical, you can also think of PHP, Java or CGI pages as well. Add a 'director' into the picture, call it load balancer. This box will be facing client requests but instead of generating web pages in response, it just proxies requests to one of the web servers. Yes, as you may have already guessed, this is what is called a reverse proxy in the linux world, and can be done with Nginx for example. In the network world, we call this a load balancer, and will be typically a Cisco CSM (if you live in the 1990s), a Cisco ACE (if you live in the 2000s), or an F5 (if you happen to live now. In case you're interested, CSM stands for Content Switch Module and is a linecard that can fit into a Cisco 6500 series chassis. An ACE is an Application Control Engine which either can be an appliance, or a linecard (again, to be put into a 6500 series switch). F5 on the other hand is not a Cisco product, it's a company based in Seattle, Washington whose main products are the LTM (Local Traffic Manager) and the GTM (Global Traffic Manager). An LTM is what we call a load balancer in this article and it also can be a standalone appliance or a Viprion chassis.
Now before we begin, one important note. Yes, I can see a question in your eyes. What if the load balancer breaks? If there is nothing to load balance incoming traffic, what's the point of having multiple web servers? The answer is: load balancers never come single. It's always a pair. Yeah, I know, try telling that to the CFO! A proper load balancer is not cheap, let alone two of them. But this is how we roll in the enterprise world :).
Terminology is always a key, so let's get to it. A VIP, or Virtual IP address is the IP address configured on the load balancer on which it accepts traffic, and what is known to the client. For example, a website of a super busy company (www.superbusy.example) can point in DNS into an IP address which is routable over the internet and reachable by clients. Normally this would be an IP address of a web server, however, in this case it will be an IP address configured on a pair of load balancers. The load balancer accepts incoming traffic (in this case: HTTP) and forwards it to the servers configured behind. These servers may not be directly reachable from the internet, and they may not need to be. The load balancer keeps track of these pre-configured servers (called real servers, reals or nodes) by monitoring their health. This can be as simple as ICMP pings, or something more complex, like issuing HTTP requests against them and expecting a certain response. Whenever the load balancer receives whatever response it expects, it is happy to direct traffic there. When there is no response, or the response does not meet certain requirements, the load balancer marks the real as offline or unavailable and will not direct traffic there. The group of reals (or nodes) associated with a particular VIP is called a pool. The method of polling their statuses is done by configuring monitors or probes.
One thing left to discuss is the reason to use load balancers. I'm glad you asked! The short answer is scalability. When you have extremely high traffic (and I mean _really_ high volume, hundreds and thousands of hits per second) you will soon arrive to a stage where there isn't a faster CPU to upgrade to, there isn't more memory, there is no faster hard drive or whatever component you wish to upgrade. There just simply isn't. Most SOHO sysadmins fall into the trap of upgrading whatever they can get money for. But this is a dead end. This is not a scalable solution, there will be a point where there is nothing to upgrade to. You need an architectural change. Not a faster server, but another. If traffic volume keeps getting higher and as demand grows, you can then add a third, fourth server as well. Obviously you need a load balancer to direct traffic, monitor the servers etc. But this not only allows you do double, triple or quadruple your capacity. It also allows you to have a downtime without anybody noticing it. If you need to take one server down, that's fine, the rest will deal with the traffic. No more overnight maintenance windows. Yes, that's right, so you can pay less to your sysadmin, because he doesn't have to work overnight anymore. Think about TCO (Total Cost of Ownership) and you'll see that a load balancer is a brilliant thing to have.
Let's see a basic example of configuring a load balancer in front of two web servers. In this tutorial I'm going to use F5's Virtual LTM which is freely available to download from their website. I'm using VMware Workstation on my laptop, in which I have three virtual servers. The load balancer itself, and two PCs: an XP SP2 with Abyss Web Server, and a Debian Jessee with Apache 2 on it. Please take a look at the diagram below, it is crucial to understand the environment in which this load balancing is built.
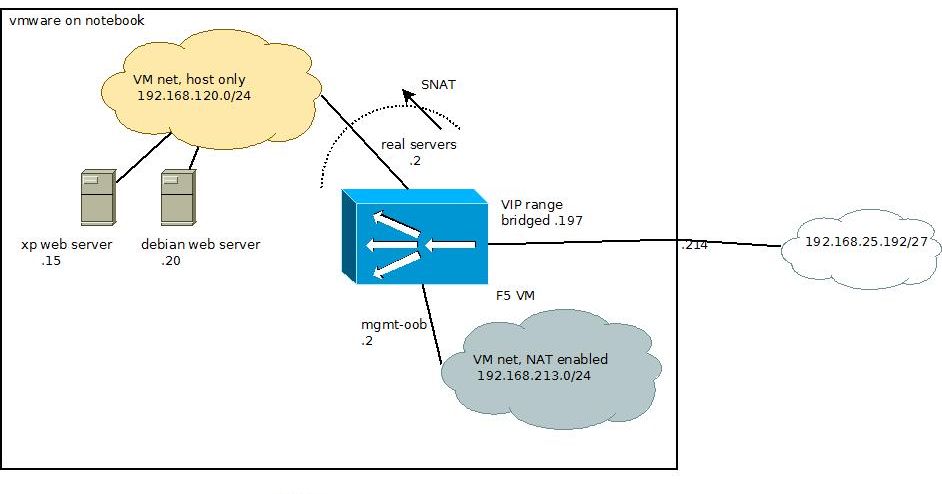
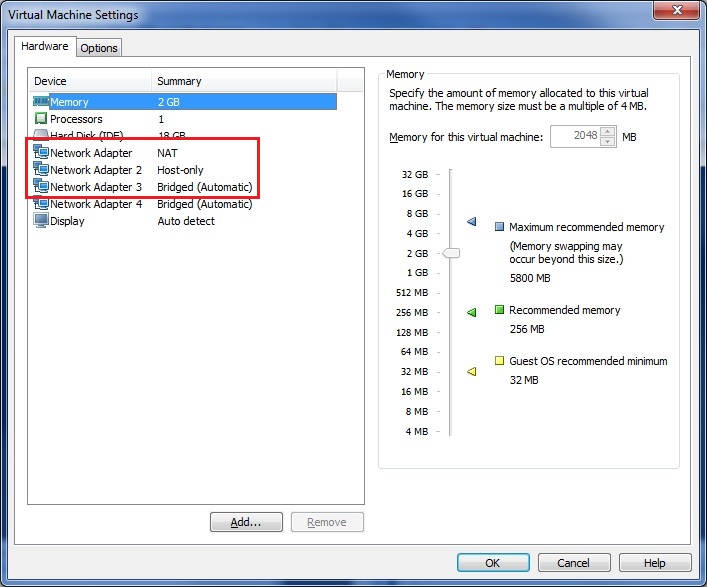
The big square represents my laptop, in which there are two networks created. A NAT-only subnet (used for management interface on the F5), a host-only subnet (for the real servers) and a bridged subnet (for the VIPs). As you can see, my laptop is plugged into the subnet 192.168.25.192/27 which is bridged through to the F5. This subnet is reachable from the 'outside' so all the VIPs will be in this subnet. This is what IP address clients should be given through DNS if they query your website. The NAT-enabled internal subnet is only reachable from the notebook itself and therefore will be perfect for OOB (out of band) access. The load balancer's management interface does not have to be reachable from 'outside' for obvious reasons. The third, also an internal subnet is where all the reals can be found. This is an isolated network and can't be reached from the outside. It can be only contacted from wihtin my notebook (as it's hosting the vmware itself) and the F5. For this, the F5 has to have three network interfaces, this can be seen on the image below.
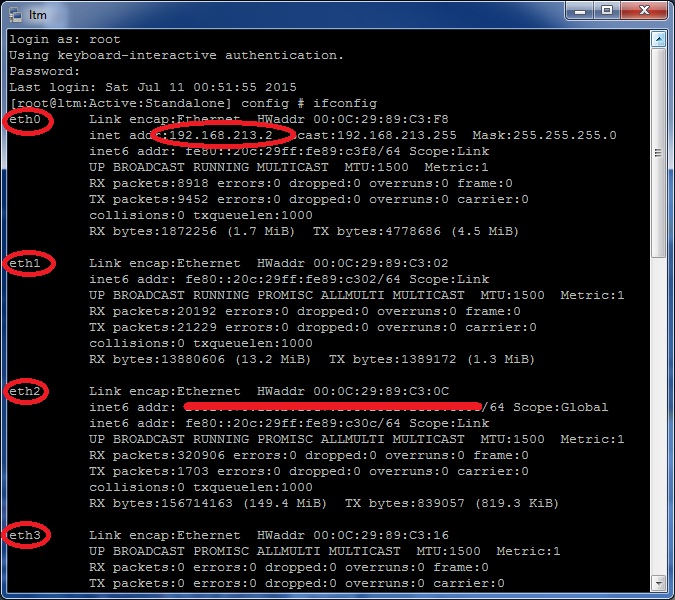
Once you've installed the F5 virtual LTM, you'll find four ethernet interfaces, named from eth0 to eth3 (we don't need all four for this article). You can identify these interfaces by MAC address. Note, that only the management address will have an IP address, all other addresses can be configured through the web-based interface.
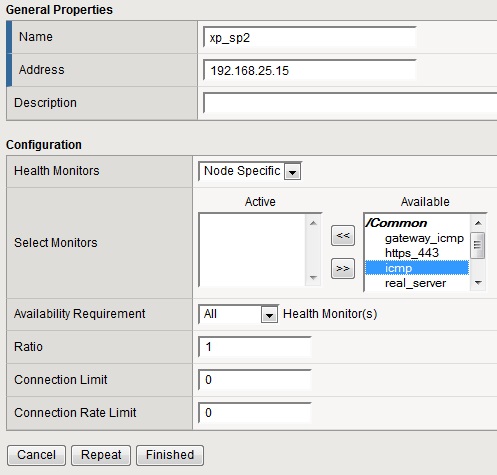
After following the initial setup over the console, you'll end up with a basic web interface (use the OOB management interface). Let's jump in and create our first load balancing solution. First, you need to create the basics. The two real servers and them forming a pool can be configured under Local Traffic / Nodes. Fill in the name, IP address. Description is optional, so is a node specific monitor. If you remember, monitors are polling the health and status of the node and should a node fail, traffic will no longer be directed to it. The default is an ICMP monitor, but it could be more useful to set up a HTTP monitor to check the actual service, rather than the host.
Go ahead and create the second node, then head over to Local Traffic / Pools / Create and add the two existing hosts to a newly created pool. Once you're finished, you'll see the following when looking at them members of a given pool.
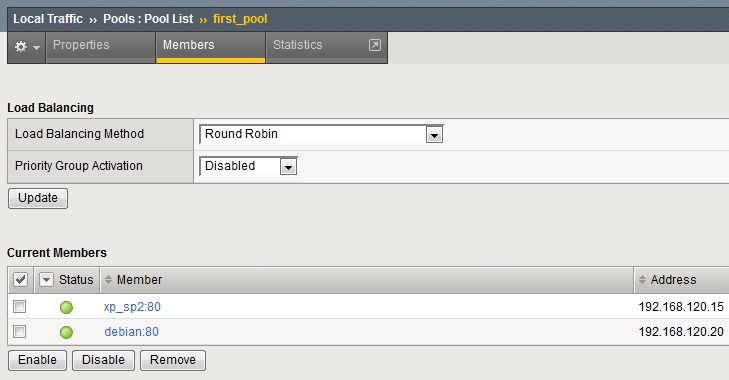
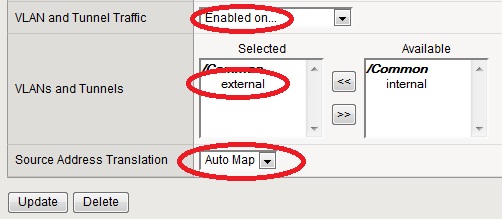
Now you have all the reals grouped together in a pool, so traffic will be load balanced equally between these two. Equally, as you haven't set up any ratio or weight and they are left at default. Now it's time to set up the actual VIP. Head over to Local Traffic / Virtual Servers / Vrirtual Server List. Hit the Create button, and give it a name and desciption. Type should be left at standard, Source would be any, so give 0.0.0.0/0, destination would be a host. Pick an IP address on your bridged subnet that is not currently in use. As we're setting up an HTTP VIP, select HTTP for service port, the actual number (80) will be auto-filled in. For the time being, leave everything else as is, but select Enabled on... on VLAN and Tunnel traffic (and select your external interface, facing clients). Source address translation should also be modified, set it to Auto Map. Head further down to the Resources section and pick your pool that you've already configured. Nothing else needs to be changed, let's finish the process.
Source NAT is extremely important in the above section, as this will enable your real servers to actually respond to client's requests. Remember, that they sit on a host-only VLAN, so clients are talking to your F5 only. If there was no SNAT in place, your servers would see the client's original IP address for which they have no network connection to. But because of the SNAT setting, the F5 sends packets with its own IP, so your reals can respond. It's the F5's job to translate these responses back to the clients as if it was coming from itself. Neat, huh?
That's it, your VIP is ready and can now respond to incoming client requests. Take a look at the video below, which is a video made on my laptop as a client, asking for HTTP content from the IP address 192.168.25.199. I have chosen one windows and one linux box as real servers deliberately, so the default pages are completely different. For the sake of this test, it doesn't really matter what the web content is, but it's nice to see that whenever I do a reload, the content changes. This is because it is being served from both servers in an alternating way, thanks to the load balancer. If the web pages would be identical, the end user would have no idea that there are actually multiple servers processing his/her request.
In the next article, we'll see why and how we can add SSL offloading to our existing VIP.
- Log in to post comments